Pact Testing with .NET
Recently I’ve been working on a strategy for implementing pact testing for a client who are predominantly a .NET shop. I’ve used the Pact-Net SDK, which certainly does the job, but there’s not a lot by way of .NET-focussed documentation or examples online. I’ll share what I’ve learnt in this post, in the hope it’ll help someone else on the same voyage of discovery.

I’ll give a brief overview on what pact testing is, but there are plenty of good articles online that go into more detail, and the Pact documentation describes all the core concepts fairly well.
What Problem Does Pact Solve?
Most modern software systems will be built of multiple individually-deployable components. In all likelihood there are multiple front-ends, even more API’s, message queues, back-end processes etc etc. You can test each of these individually through unit and integration testing, and hopefully you’re already doing that. The difficult part is understanding the dependencies each of these components have on each other, and how to test this. Quite often, this requires the entire system being deployed into a non-production environment and then a suite of regression tests will be executed, either using automated test orchestration tools, or manually.
This “end-to-end” testing creates a bottleneck on the development lifecycle. Changes have to be grouped up into releases, deployed as one, then everything else is held up while we wait for sign off, then the process repeats.
Pact solves this problem by defining contracts that describe the interactions between each of your services (or “pacticipants” in Pact parlance). As long as Pact can verify that both sides of a contract are being honoured, then you know that a change is safe to deploy to an environment. This allows you to deploy a constant stream of changes to individual components with confidence and without the need for extensive end-to-end regression testing.
How Does It Work?
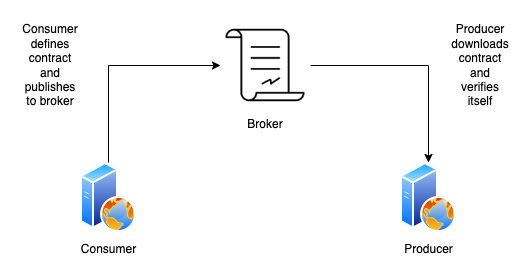
For each contract, there is a Consumer and a Producer. The core principle at the heart of Pact testing is that the Consumer defines the contract.

The steps are roughly as follows:
- The Consumer writes a test that defines a contract
- That contract is then used to create a mock, allowing the Consumer to be tested in isolation
- The contract is published to a Pact Broker
- The Producer downloads the contract from the Pact Broker and then verifies itself
Defining the Contract
I’m using the PactNet Nuget package (version 5.0.0-beta.1). You’ll need to enable pre-release packages in your package manager in order to access it.
To test the Consumer, I’m using a WebApplicationFactory and passing in the Program class from the API being tested. My test class inherits IClassFixture and passes in the WebApplicationFactory as the generic tye, which leads to the factory being injected into the constructor.
We also need an IPactBuilderV4 object for building the Pact contract itself, which we instantiate in the constructor. The full constructor is as shown:
public PactConsumerTests(ITestOutputHelper output, WebApplicationFactory<Program> factory)
{
    var config = new PactConfig
    {
        PactDir = "../../../../pacts/",
        Outputters = new[]
        {
            new XunitOutput(output)
        },
        DefaultJsonSettings = new JsonSerializerSettings
        {
            ContractResolver = new CamelCasePropertyNamesContractResolver(),
            Converters = new JsonConverter[] { new StringEnumConverter() }
        },
        LogLevel = PactLogLevel.Debug
    };

    _pactBuilder = Pact.V4("Consumer", "Producer", config).WithHttpInteractions();

    _factory = factory;
    _output = output;
}
The PactConfig object is used for instructing the PactBuilder how to behave. The part that’s most of interest is the PactDir property, which tells the PactBuilder where to save the Pact files it generates.
Now that we have our PactBuilder and our WebApplicationFactory, we can run a test. The test serves two purposes:
- It defines the Pact, which creates the contract and provides us with a mock we can use
- We use the mock to test that our Consumer service behaves as expected.
Here’s the test in full:
[Fact]
public async void GetRandom_ReturnsCorrectResponse()
{
    _pactBuilder
        .UponReceiving("A GET request to the String endpoint")
            .Given("some provider state")
            .WithRequest(HttpMethod.Get, "/String")
        .WillRespond()
            .WithStatus(System.Net.HttpStatusCode.OK)
            .WithJsonBody(new
            {
                theString = Match.Type("test")
            });

    await _pactBuilder.VerifyAsync(async ctx =>
    {
        _output.WriteLine($"Mock server URI: {ctx.MockServerUri}");

        Environment.SetEnvironmentVariable("PRODUCER_URL", ctx.MockServerUri.ToString());

        var client = _factory.CreateClient();
        var response = await client.GetAsync("/random");

        response.EnsureSuccessStatusCode();
        string responseContent = await response.Content.ReadAsStringAsync();
        _output.WriteLine(responseContent);

        dynamic responseJson = JsonConvert.DeserializeObject(responseContent);
        int responseLength = responseJson.Count;
        responseLength.Should().Be(5);

        string firstMockResponse = responseJson[0].producerString;
        firstMockResponse.Length.Should().NotBe(0);
    });
}
As you can see, the PactBuilder has a nice syntax that lets us define the contract in a fluent API. The Given function allows us to define some Provider State, which I’ll describe in detail later in this article.
The part that actually does some testing is in the _pactBuilder.VerifyAsync function. The context (ctx) object gives us access to the MockServerUri property, which is the URL where we can access our mock. In this case, I’m injecting it into the API being tested as an environment variable, but there are lots of different ways you could do this.
We then create our client from the WebApplicationFactory, call the endpoint and check to make sure the response is as we expect it to be.
Publishing the Contract
The central source of truth for our contracts is the Pact Broker. This is open source software you can spin up and run yourself. However, if you’d prefer not to have the hassle, you can use PactFlow, who will host it for you. They have a free developer tier to get started, but the free tier is very limited and for a production workload of just about any size you’d need to be on one of the paid tiers.
Now that we have a Pact file generated by our test, we need to publish it to the broker. We can do this with the pact-broker CLI tool, so you could run it from your dev machine or from a build agent:
pact-broker publish ./pacts -b $BROKER_URL -k $API_KEY -a v0.1
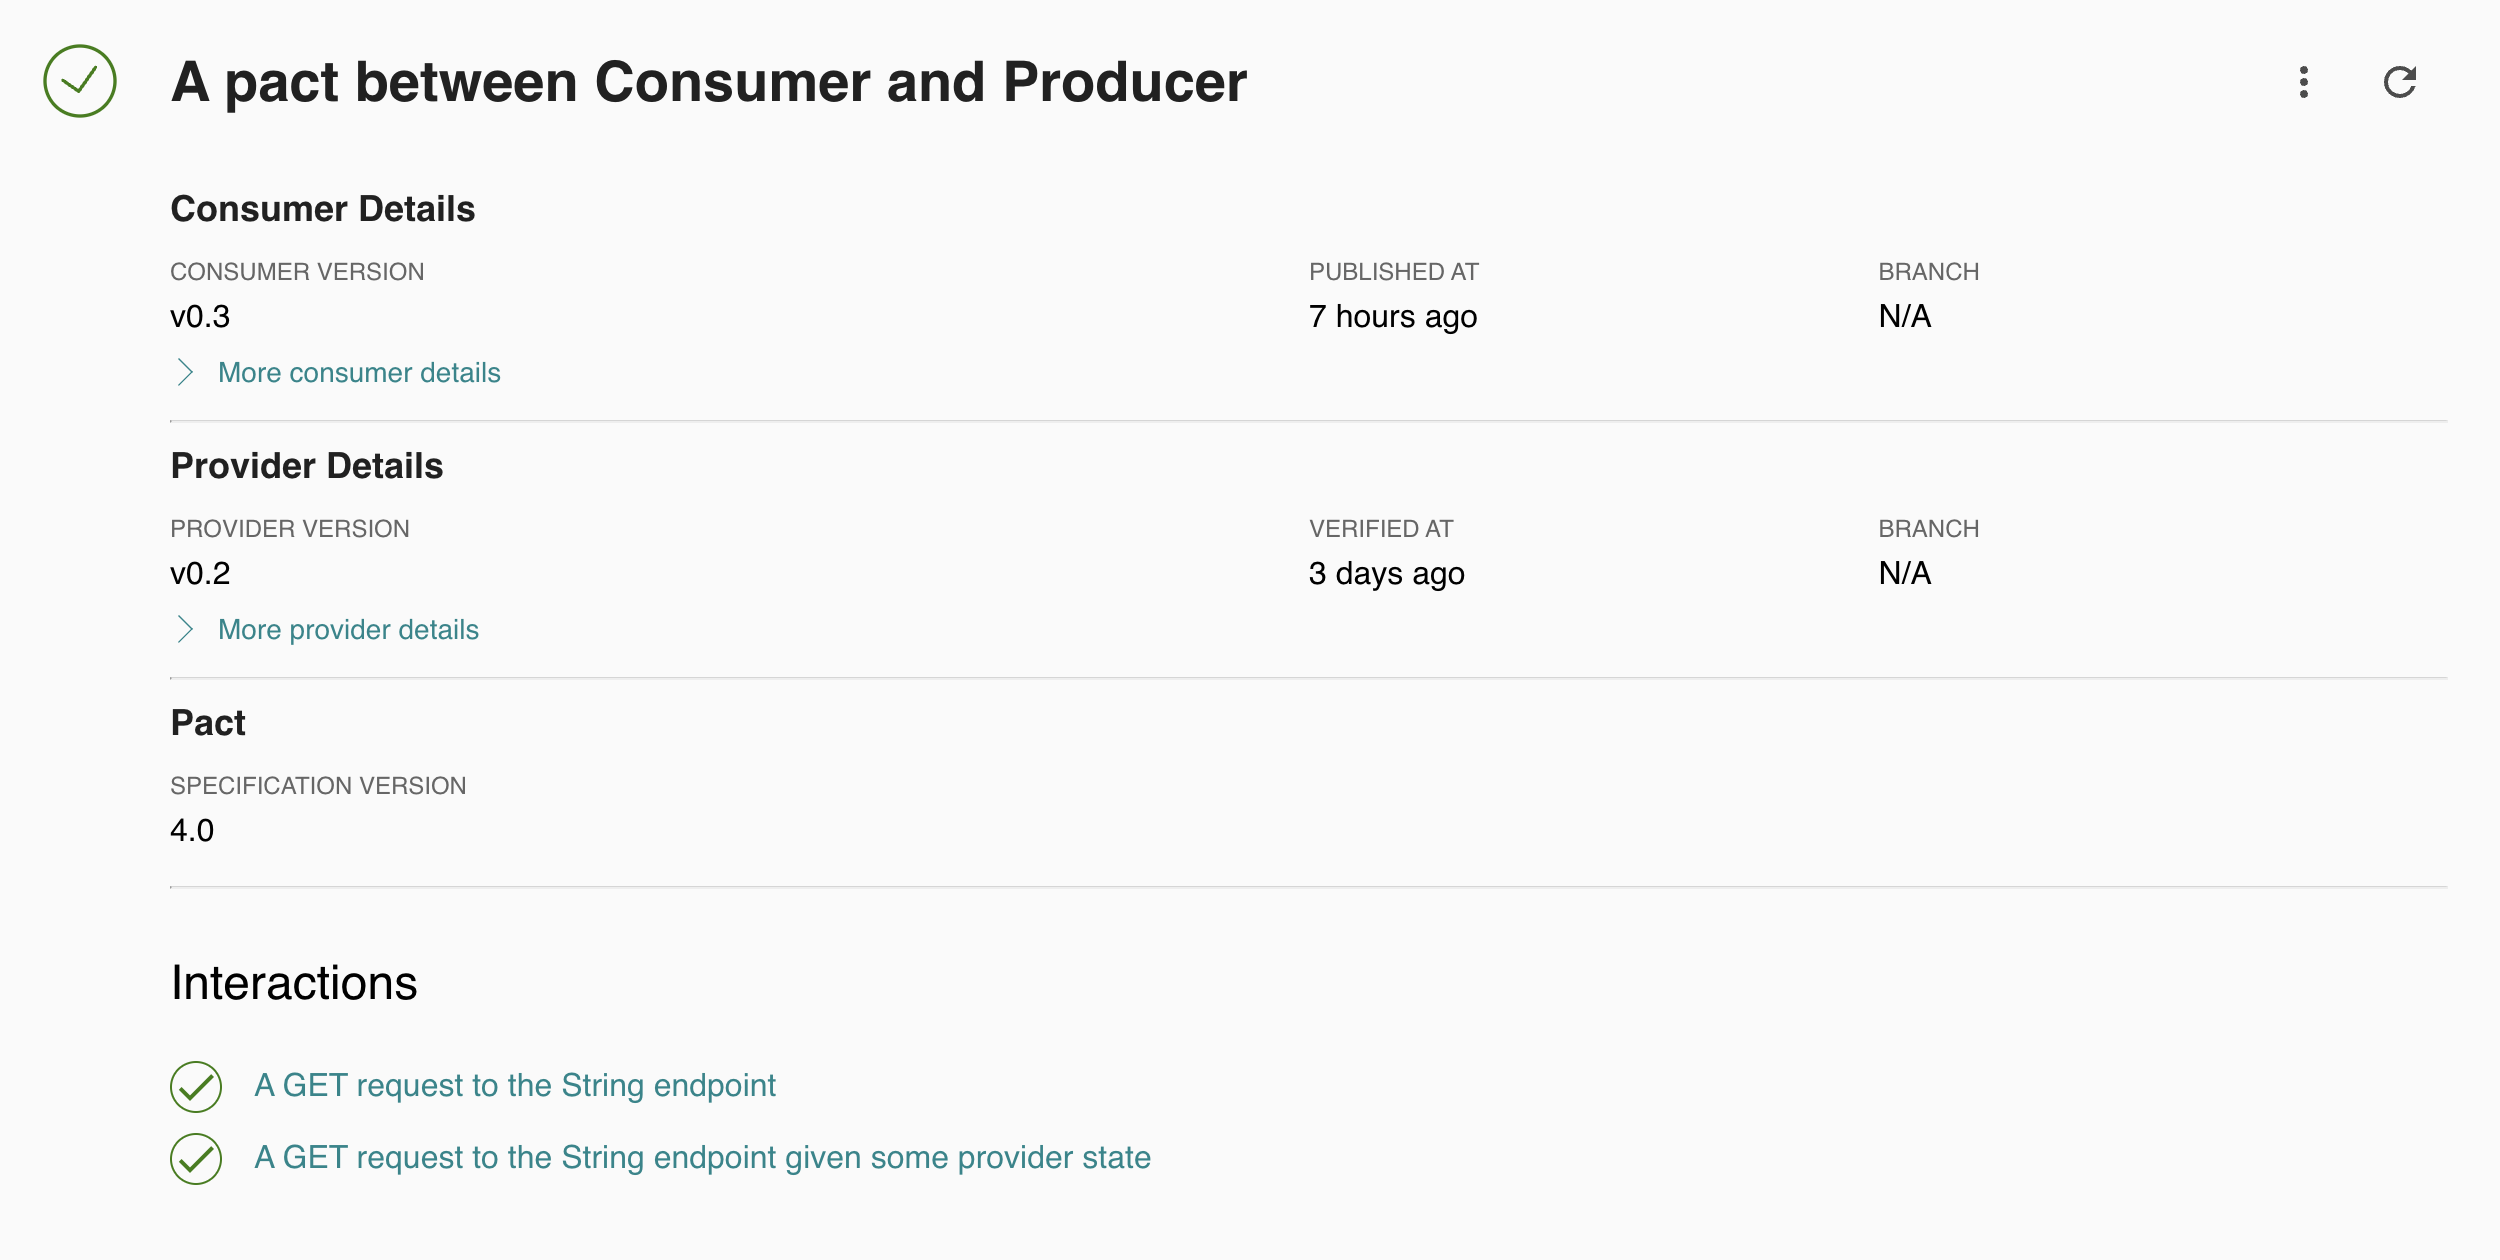
You can get the broker URL and the API key from the settings panel in the Pact broker web console. Once published, you can go to the Pact broker web console and view details of the Pact:

When you first publish it, you’ll see that it has an Unverified status. It will remain in that status until it has been successfully verified by the Producer.
Verifying the Producer
Now that we have a contract published, we need to verify it by proving our Producer satisfies it.
The most important thing to note here is that we cannot use any of dotnet’s test servers to host the Producer (e.g. WebApplicationFactory). The reason is that internally, Pact is using Rust to do the verification, so the endpoint needs to be available on the TCP stack, not just in the dotnet process. We there create a class fixture that properly hosts the API:
public class ProducerApiFixture : IDisposable
{
    private readonly IHost server;
    public Uri ServerUri { get; }

    public ProducerApiFixture()
    {
        ServerUri = new Uri("http://localhost:9223");
        server = Host.CreateDefaultBuilder()
                        .ConfigureWebHostDefaults(webBuilder =>
                        {
                            webBuilder.UseUrls(ServerUri.ToString());
                            webBuilder.UseStartup<TestStartup>();
                        })
                        .Build();
        server.Start();
    }

    public void Dispose()
    {
        server.Dispose();
    }
}
We then use a PactVerifier from the PactNet Nuget package to run a test that verifies the API satisfies the contract:
[Fact]
public void EnsureProducerApiHonoursPactWithConsumer()
{
    var config = new PactVerifierConfig
    {
        Outputters = new List<IOutput> { new XunitOutput(_output) }
    };

    using var pactVerifier = new PactVerifier("Producer", config);

    pactVerifier
        .WithHttpEndpoint(_fixture.ServerUri)
        .WithPactBrokerSource(new Uri(PACT_URL), options =>
        {
            options.TokenAuthentication(PACT_TOKEN);
            options.PublishResults("v0.1");
        })
        .WithProviderStateUrl(new Uri(_fixture.ServerUri, "/provider-states"))
        .Verify();
}
From this, you can see that we’re specifying the HTTP endpoint to use (which is the host we created in the fixture), specifying the broker to use (note that for this step the test talks directly to the broker - we don’t need to explcitly download the files), we specify some provider state (more on this later) and then we call Verify. And that’s it. As long as the API returns a response that satisfies the contract, the test will pass and the result gets published to the broker, leading to the contract status being set to Verified.
Provider State
In order to verify a Provider, the Provider may need some state to be set. For example, the Consumer might state that calling /users?id=1 will return a user object with some data in the response. Therefore, in order to satisfy the contract, the Provider needs to have a user record with an ID of 1 in it’s data store, or else it won’t be able to verify the contract. This is where Provider State comes in.
When the Consumer defines the contract, it will specify the Given clause, which takes a string and gives a descriptive title of the state it expects there to be. In our example, it might be something like:
Given("A user with ID 1 exists")
It is then the responsibility of the maintainers of the Producer API to implement this state. The preferred .NET pattern for doing this is using Provider State middleware.
When we verify, we use the WithProviderStateUrl function to tell the verifier where to call to set up the provider state before the verification runs. We add the middleware when we configure the API:
app.UseMiddleware<ProviderStateMiddleware>();
The middleware itself is set up to handle the request:
public async Task Invoke(HttpContext context)
{
    if (context.Request.Path.StartsWithSegments("/provider-states"))
    {
        await HandleProviderStatesRequest(context);
        await context.Response.WriteAsync(string.Empty);
    }
    else
    {
        await _next(context);
    }
}

private async Task HandleProviderStatesRequest(HttpContext context)
{
    context.Response.StatusCode = (int)HttpStatusCode.OK;

    if (context.Request.Method.ToUpper() == HttpMethod.Post.ToString().ToUpper() && context.Request.Body != null)
    {
        string jsonRequestBody = string.Empty;
        using (var reader = new StreamReader(context.Request.Body, Encoding.UTF8))
        {
            jsonRequestBody = await reader.ReadToEndAsync();
        }

        var providerState = JsonConvert.DeserializeObject<ProviderState>(jsonRequestBody);

        if (providerState != null && !string.IsNullOrEmpty(providerState.State))
        {
            _providerStates[providerState.State].Invoke();
        }
    }
}
The body of the call to the provider state middleware will include a property called State of type string. The middleware should have a dictionary that matches this string to a function that can be executed to ensure that the necessary state exists prior to verification. This could be executing a SQL script, inserting data via an Entity Framework context, writing to a NoSQL data store, uploading a file to a blob store etc.
Further Reading
This has been an introduction to the core concepts of pact testing using .NET. However, there’s a lot more you can do with it, all of which is described in detail in the Pact documentation. Specific areas worth looking into are:
- Setting up environments in the Pact broker, and tracking which versions of which services are deployed to each environment
- Using this information to run the
Can I Deploy?command as part of your CI pipelines to ensure that all relevant pacts are verified prior to a deployment taking place - Setting up pacts for disconnected, message-based interactions, as well as the simpler HTTP interactions described in this article.